This post may contain affiliate links. See my disclosure policy.
I’ve tried many-a protein cheesecake recipe, but this one I’ve created beats them all. HANDS DOWN. Why settle for a boring protein bar when you can have this dreamy Protein Cheesecake? Who doesn’t want to eat cake and still hit their protein goals?
This protein cheesecake recipe is the ultimate combination of indulgence and nutrition.
With each slice delivering 17 grams of protein and only 190 calories, it’s the perfect treat to satisfy your sweet tooth while helping you stay on track with your protein goals.
Plus, it’s straightforward to make, even for beginners and works great for meal prep. No more bland snacks—this protein cheesecake is here to brighten your day!
Why You’ll Love This Recipe
- High in Protein: Each slice of this cheesecake delivers a good dose of protein, making it a tasty way to meet your daily needs.
- Lower in Calories: With only 190 calories per slice, this dessert can fit in almost any macros.
- Simple and Quick: Despite its impressive look and flavour, this cheesecake is straightforward to make, even if you’re new to baking.
- Great for Meal Prep: This protein cheesecake recipe is perfect for meal prepping, so you can enjoy a high-protein snack all week long.
Ingredients and Substitutions
For the cheesecake filling:
- Low-fat smooth cottage cheese – The creaminess that cottage cheese gives this protein cheesecake recipe is unparalleled. It has a high protein content and is the hero of this recipe, giving it a creamy lusciousness that is synonymous with the perfect cheesecake.
- Substitution: If your country does not have smooth cottage cheese – no problem. Use an immersion mixer to blend or blend in a food processor until creamy.
- Low-fat plain yoghurt – I always have plain yoghurt in the house and it’s the perfect addition to this cheesecake adding moisture and that tang. What changed this recipe for me was using low-fat Greek yoghurt – it’s thick and creamy and gives body to the cheesecake. I recently discovered The Gourmet Greek yoghurt and I am in loooveee.
- Substitution: You can definitely use double-cream or fat-free yoghurt as well but just keep in mind it will change the macros and in the case of fat-free yoghurt it could also affect the texture/mouthfeel as it is less creamy.
- Lemon juice – In my mind, every fruit-based cheesecake needs lemon juice. Since we are trying to balance sweetness with tanginess, this is a natural addition.
- Lemon Zest – I have made my cheesecakes without the zest, and although optional I HIGHLY recommend adding it in. It just adds another level of lemonyness that brings this cheesecake together.
- Whey protein – I used the PSN Lifestyle Vanilla whey protein and this adds additional sweetness as well as that protein kick.
- Variation: I have not tried myself but I think you can experiment with different flavoured proteins like strawberry or even chocolate. There are so many flavours out there these days so the possibilities are endless. I would say though, if you are going the chocolate route I would leave out the lemon juice and zest and play around with other toppings.
- Egg Whites – The egg whites provide additional stability (and protein) that help the cheesecake keep its shape.
- Cake flour – This is to stabilise our cheesecake and prevent cracking.
For the crust:
- Tennis biscuits – If you are South African, you know that every tart/cheesecake around is made with a Tennis/coconut biscuit base.
- Substitution: I have not tried it but Digestive biscuits or Marie biscuits can also work or if you are abroad I know that Graham crackers are a popular choice.
- Variation: You could totally experiment with this and try Biscoff cookies or even Oreos in this (omg that sounds good). Just keep in mind that this will affect the calories and macros of the recipe.
- Variation: I have also made this cheesecake crustless and it bakes perfectly fine. If you want to go lower carb on this then that’s an easy way to do that.
- Salted Butter – butter binds the crust together so you can pack it into the tin. I use butter because, well, flavour. We are already increasing the protein and lowering the calories in other ways so I say we live a little and eat the butter.
- Substitutions: Vegan butter/margarine should be a fine substitute for butter.
For the topping:
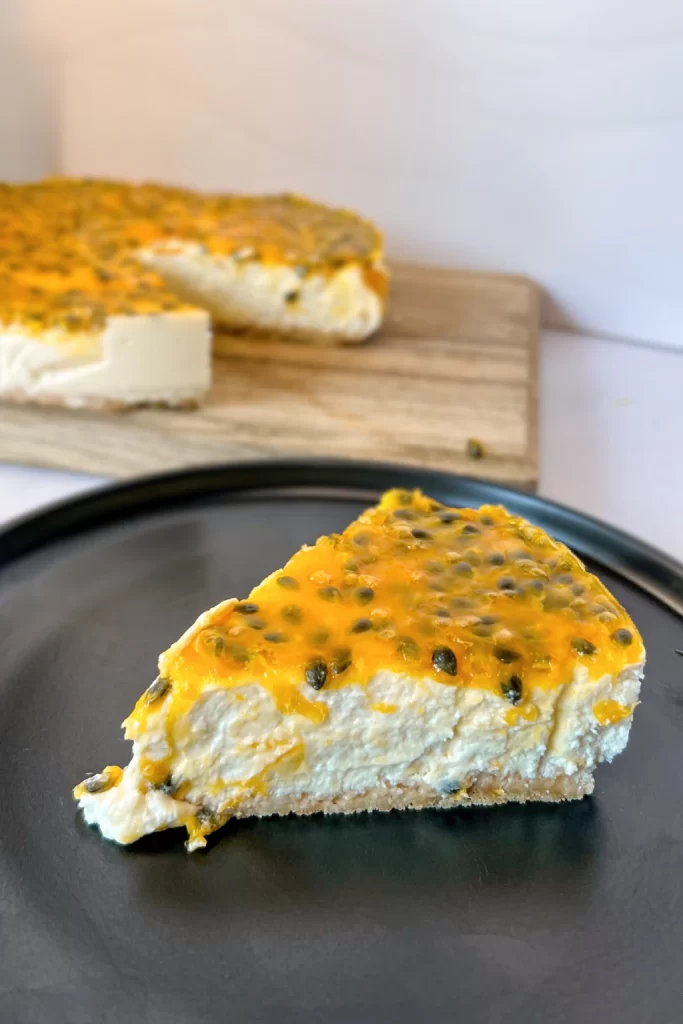
- Granadilla/Passionfruit – the zinginess of the granadilla is unparalleled in this cheesecake and plays so nicely with the lemon. You can play around with different fruits as toppings so the possibilities are endless.
- Gelatine – used to set the topping so it stays firm on the cake. If you don’t want to use gelatine, agar-agar will be a fine substitute.
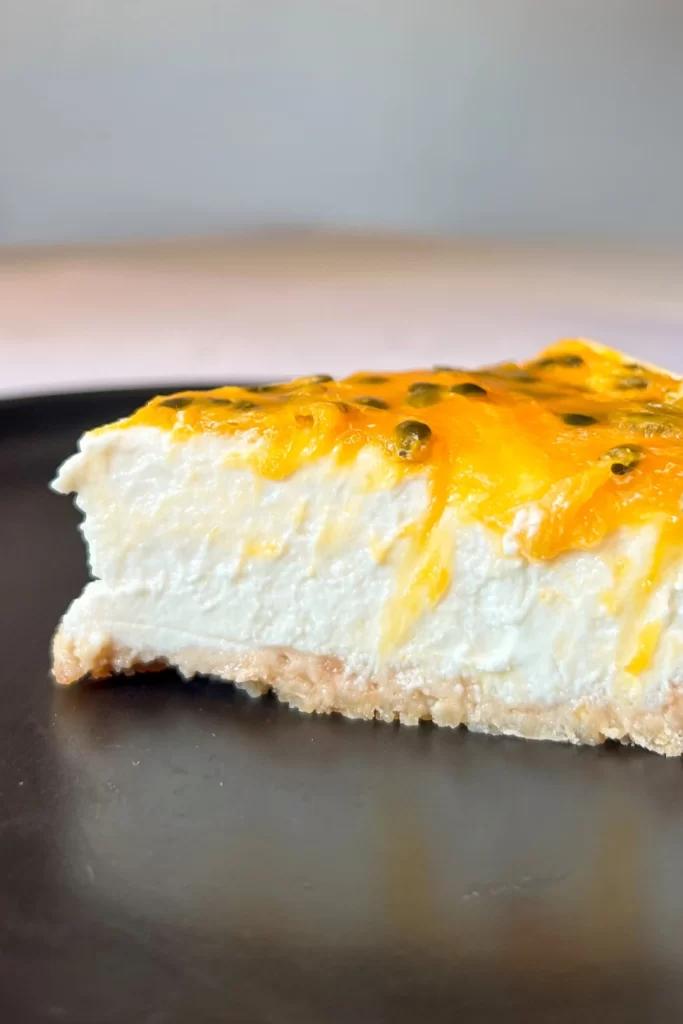
Protein Cheesecake Recipe
Ingredients
For the Crust:
- 70 g Tennis Classic Biscuits (about 9 biscuits)
- 35 g salted butter (2½ tbsp)
For the Cheesecake Filling:
- 500 g low-fat smooth cottage cheese (2 tubs)
- 200 g low-fat plain Greek yoghurt (¾ cup)
- 90 g egg whites (~ 3 egg whites)
- 64 g vanilla whey protein (2 scoops)
- 20 g cake flour (2½ tbsp)
- 1 tbsp lemon juice
- 1 tsp lemon zest (approx. 1 lemon zested)
For the Granadilla Topping:
- 115 g granadilla/passionfruit pulp (fresh or canned)
- 1 tsp gelatin powder (5g)
- 2 tsp water room temperature
- 1 sachet sweetener to taste, if the fruit is too sour
Instructions
- Preheat your oven to 150°C.
Make the Crust
- Melt the butter in the microwave in 10 second increments until fully melted.
- Crush the Tennis biscuits and mix with the melted butter until combined.
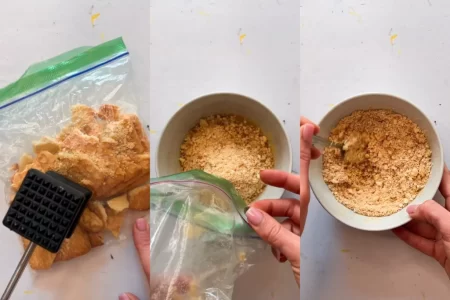
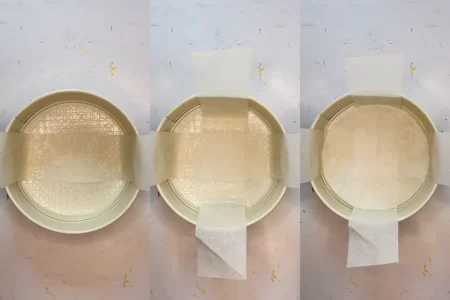
- Spray the pan: Start by spraying the inside of a 23cm (9inch) springform pan generously with non-stick spray.Layer the paper: Cut a circular piece of baking paper to fit the bottom of the pan. Then, cut two longer strips of baking paper. Place these strips in a "plus" shape across the base, allowing the ends to hang over the sides of the pan. Lay the circular piece on top of the strips. The overlapping strips will help you lift the cheesecake out effortlessly after it has cooled.
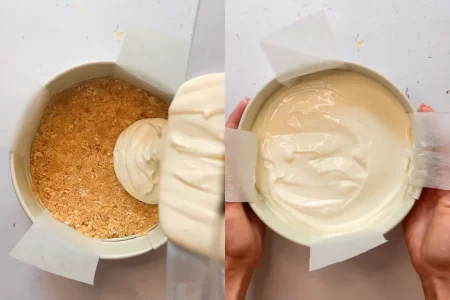
- Press the mixture into the bottom of the pan to form an even layer. Use a glass to even it out. Set aside.
Prepare the Cheesecake Filling
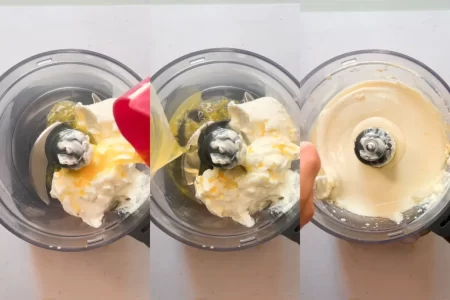
- In a large bowl or food processor, combine the cottage cheese, yoghurt, egg whites, whey protein, cake flour, lemon juice, and lemon zest (if using). Mix or blend until smooth, scraping down the sides if necessary.
- Pour the cheesecake filling over the prepared crust. Tap the pan gently on the counter to remove any air bubbles.
Bake the Cheesecake
- Wrap the outside of the springform pan with two pieces of heavy-duty foil, crossing them perpendicularly to prevent water from seeping in during baking.
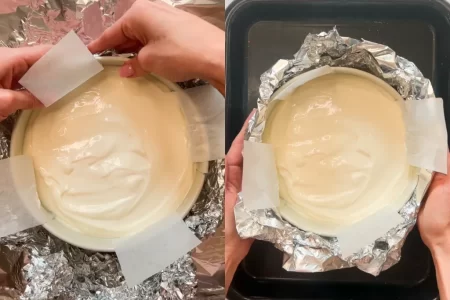
- Place the pan into a roasting pan and fill it with about 2cm of boiling water to create a bain-marie (water bath).
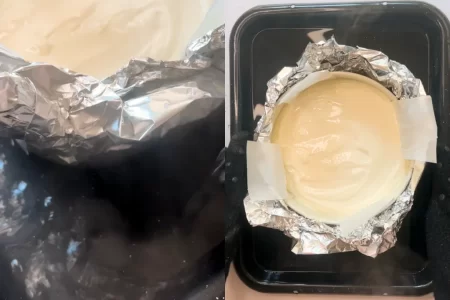
- Carefully put the roasting pan into the oven (be careful not to burn). If you feel more comfortable, add the boiling water after you placed the roasting pan into the oven so that you don’t have to carry the pan with the boiling water to the oven.
- Bake the cheesecake for 25 minutes.
- Once baked, turn off the oven, crack the door slightly, and allow the cheesecake to cool gradually in the oven for 2 hours. This helps prevent cracks.
Make the Granadilla Topping
- While the cheesecake is cooling, bloom the gelatin by sprinkling it over 2 tsp of room-temperature water. Let it sit for 5 minutes.
- In a small pot, heat the granadilla pulp over low-medium heat. Add the bloomed gelatin and stir until completely dissolved. Sweeten to taste, if necessary.
- Let the topping cool to room temperature.
Assemble and Chill
- Once the cheesecake has cooled, pour the granadilla topping over it, smoothing it out evenly. If your topping has set, you can warm in the microwave for 10 seconds to make it pourable again.
- Refrigerate the cheesecake for at least 4 hours, or overnight, until fully set.
Serve
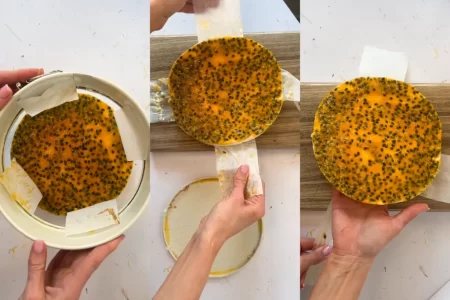
- Once the cheesecake is fully chilled, loosen the sides by gently running a knife along the edges of the pan to release any areas that might be sticking.
- Open the springform pan and carefully lift the cheesecake using the long strips of baking paper.
- Place the cheesecake onto your serving plate, then gently tug on the longer strips to slide them out from under the cheesecake. This technique ensures a smooth transfer without damaging your beautiful dessert.
- For meal prep, slice into 8 portions and store in a food-safe container lined with a paper towel to absorb any excess moisture. This cheesecake will last up to a week in the refridgerator.
Video
Notes
- Wrap It Right: Ensure the springform pan is tightly wrapped to prevent water from leaking into the cheesecake during baking.
- Cool Slowly: Allowing the cheesecake to cool gradually in the oven helps achieve a smooth, crack-free surface.
- Topping Options: Swap the granadilla with other fruits like mango, raspberry, or mixed berries for variety.
Frequently Asked Questions
How many calories are in this protein cheesecake recipe?
Each slice of cheesecake has 190 calories.
Can I make this protein cheesecake crustless?
Yes, you can bake this as a crustless protein cheesecake. Bake the filling in a baking dish according to the recipe instructions.
Can I use other protein powders?
I have not tested this with other protein powders so please try and let me know how it came out.
Can I use other toppings?
Feel free to experiment with different fruits for the topping of this protein cheesecake recipe. I have used fresh and frozen berries with success.
Can I bake it without the bain-marie?
Yes, you can but note that the cheesecake might crack.